
Introduction
We present a simple to use implementation of networking across ultrasonic frequencies, by making use of Gnuradio and a microphone and speakers. This allows you to use TCP/IP,UDP across an audio link.
In order to follow this tutorial we recommend you use the LiveDVD release of Gnuradio (which is basically a Ubuntu distribution, with gnuradio already installed). This is easily downloadable from http://gnuradio.org/redmine/news/31. First of all you will need to download the patch we made to Gnuradio, to a USB stick. You can download the patch from https://github.com/anfractuosity/ultrasonicnetworking/archive/master.zip. In order to use the patch, you need to be root, so type ‘sudo bash’, then unzip the patch, and simply run setup.sh, by typing ./setup.sh. The setup file simply patches the Gnuradio packet encoder and decoder, in order to support variable length packets.
After running setup.py, you can then initialise Gnuradio, which you need to run as root, so do sudo gnuradio-companion. And then load a.grc on your first laptop.
Figure 1 depicts our graph which enables us to perform the ultrasonic networking. We will now describe how the graph functions through each block. The first block in the top left, is the TUNTAP PDU, this allows you to create a virtual network interface, through which we can send and receive packets.
We use the “PDU to tagged Stream” block to convert the packets received from the virtual NIC, into a byte stream for the packet encoder to process. We can’t directly attach the output of the tagged stream to the GFSK modulator, as we need to add a checksum, through the use of CRC and also we need to add a preamble and header onto the packet – this is all achieved through the use of the packet encoder.
A preamble is essentially a series of bits, which can be detected at the receiver end, in order to correctly align bits, to the correct byte boundaries. The packet encoder, also adds a header after the preamble, which states how long the packet is, in bytes.
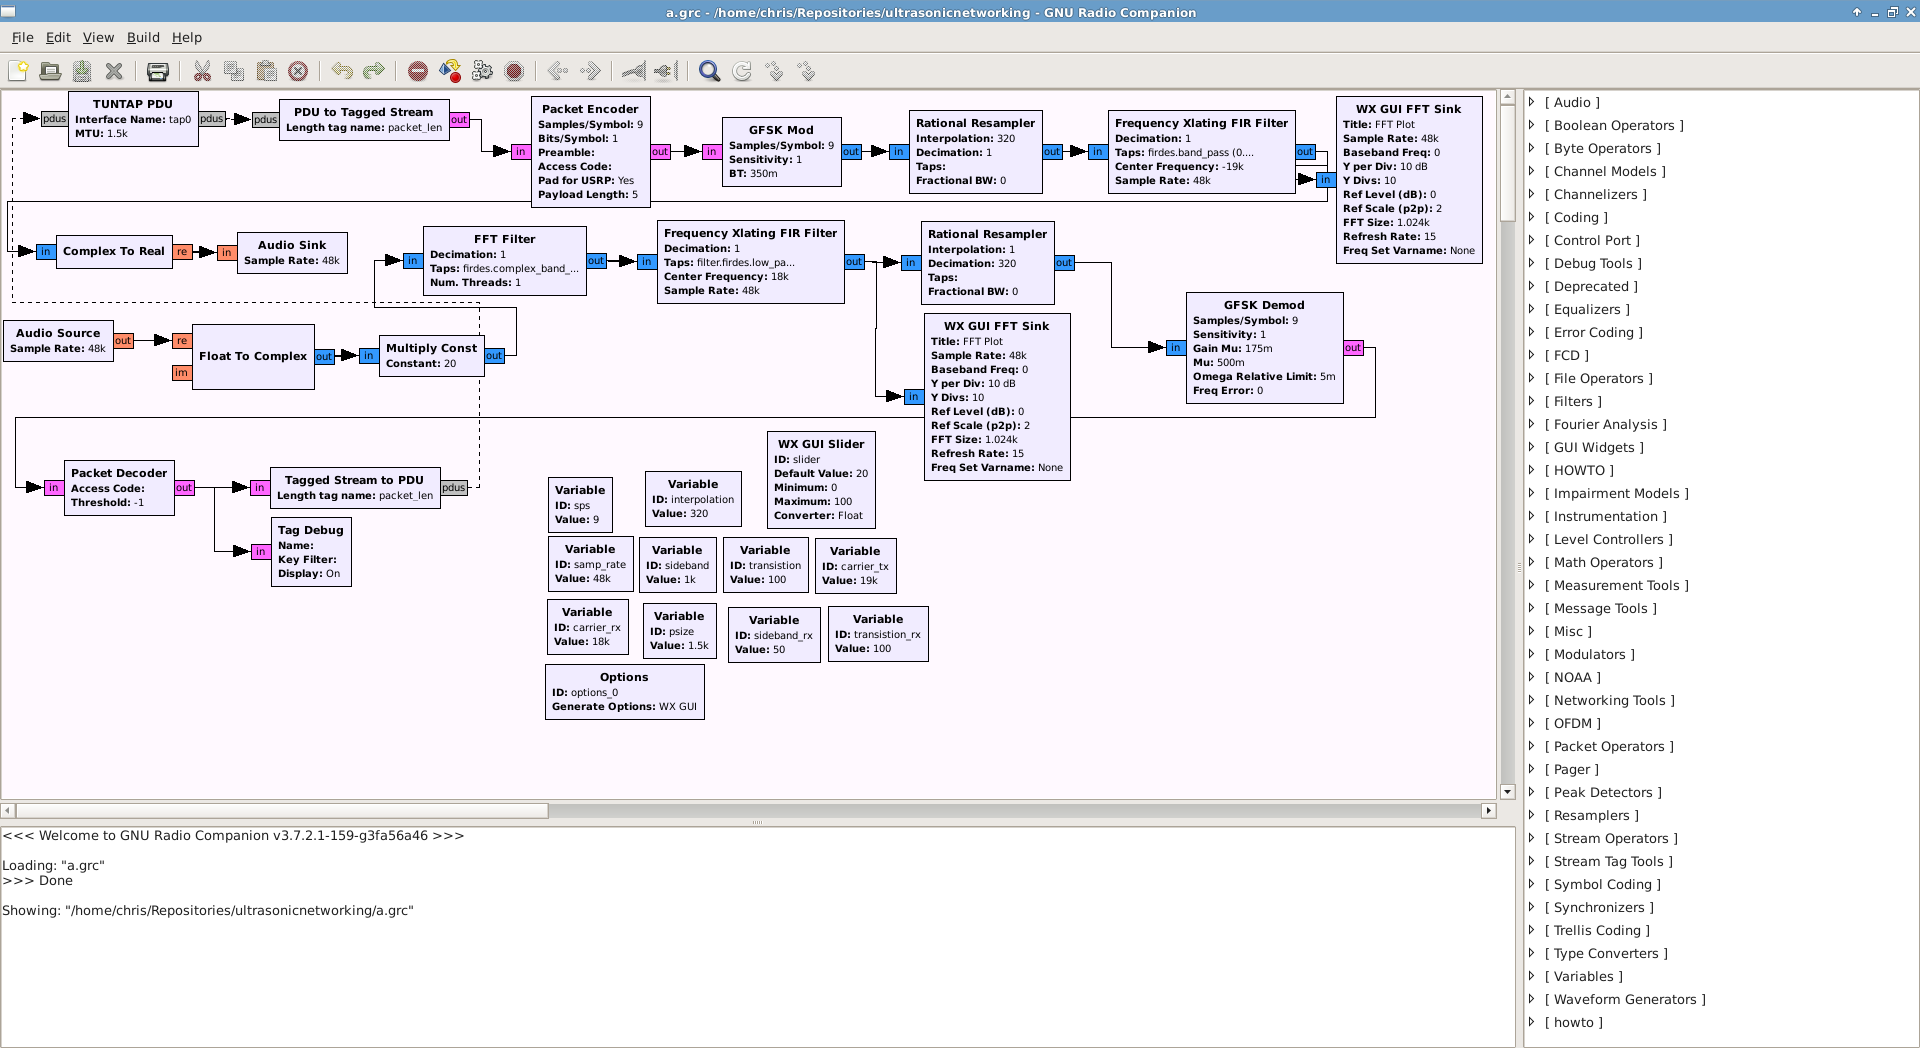
Fig. 1
The GFSK modulator essentially performs Frequency Shift Keying modulation. As you can see in Figure 2, the frequency of the modulated signal is lower, when a ‘0’ is being sent, than a ‘1’ being sent. We found that in the context of ultrasonic networking using laptops and microphones, that FSK performed better than PSK (Phase Shift Keying – which uses phase changes, to communicate bits), which is another modulation technique.
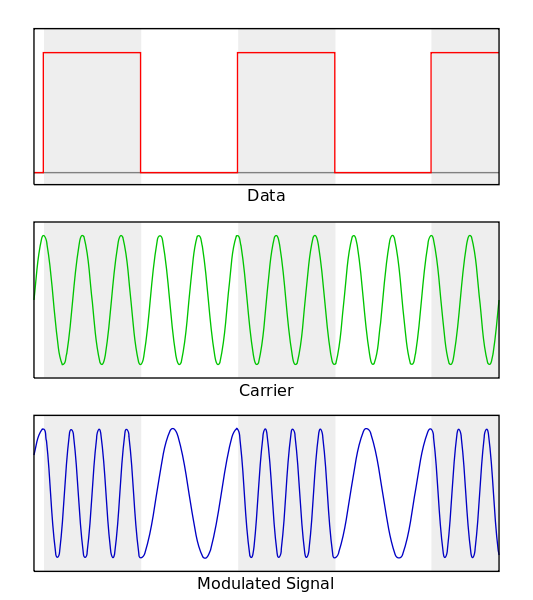
Fig. 2 (courtesy wikipedia)
A very important aspect of the GFSK block is the number of Samples/Symbol. We set this to a value of 9. This means that for each symbol received by the modulator, 9 samples are generated. The higher this number the more resilient the signal is to noise, but consequentially the lower the baud rate (which essentially means the longer it takes to send packets).
Baud rate refers to the number of symbols which are transferred per second.
We then use the rational resampler block, to make the signal further resilient. For every sample in, it generates 320 out.
We use a frequency-translating FIR filter, to translate the frequency of the incoming signal. We shift the signal by -carrier_tx, which is -19kHz in this example. This is so that the signal is just outside of the human range of hearing.
As we have been working with complex signals at this point, we need to convert the complex output into a floating point output for the audio card, we achieve this through the use of a ‘Complex to Real’ block.
The bottom part of the graph, depicts the receiver section of the program. It essentially performs the same functions, but in reverse.
However there are two additional blocks after the ‘Float to complex’ block. The multiply const block, allows you to multiply the output from the microphone by a fixed number. The block after this is a bandpass filter, to only allow a small range of frequencies to pass through to the demodulator, this helps remove a large amount of noise which is present from the microphone’s output.
In Figure 3, you will see that there are two graphs. The top graph, depicts the output sent to the transmitter and the bottom graph depicts the input received from the microphone (after a bandpass filter has mean applied to it). There is also a slider present at the top which allows you to multiply the signal from the microphone by a specific value. This is useful when using 2 laptops which are a greater distance away from each other.
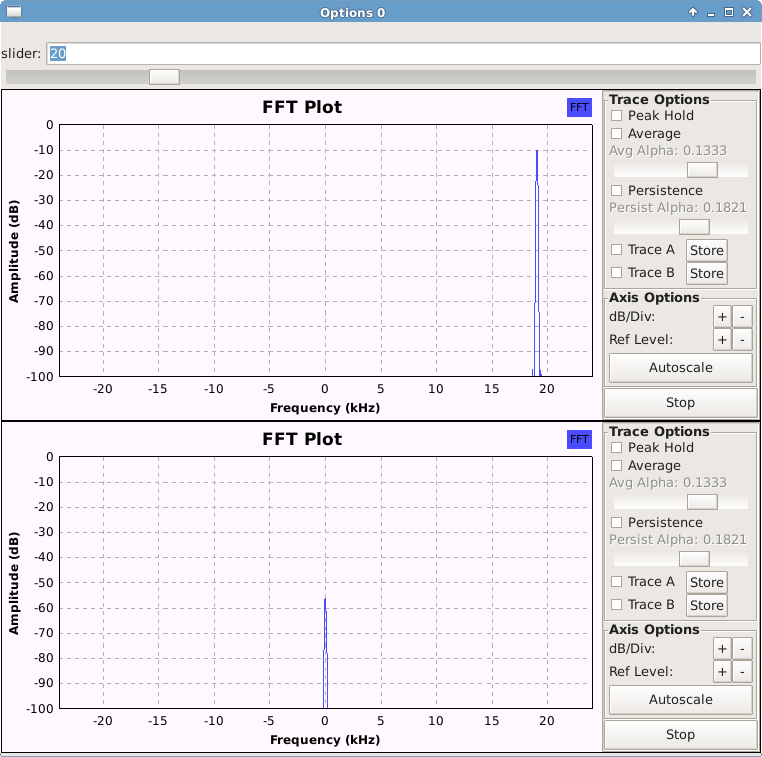
Fig. 3
Duplex
Figure 4 depicts the full duplex signalling we use. You can see that we transmit in this example at two different frequencies, 19kHz and 18kHz. This allows both laptops to send their own signal simultaneously.
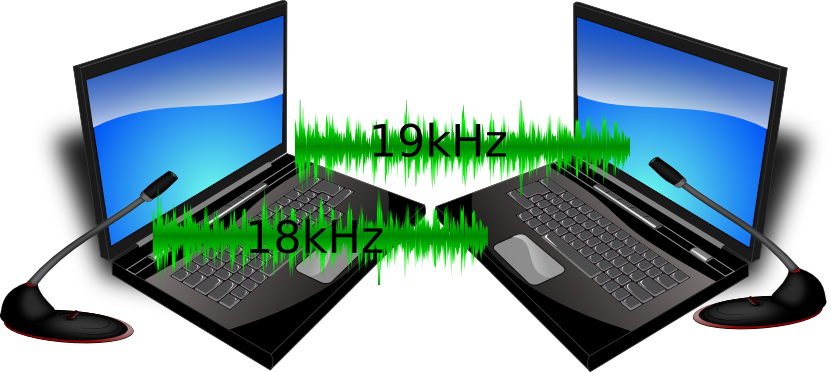
Fig. 4
Setup
In Gnuradio-companion, you will need to go to Build > Execute, in order to execute the graph. You then need to assign an IP address to the tap0 interface it creates for you. You need to do this through a terminal, typing sudo ifconfig tap0 192.168.1.10 for instance.
You need to perform the same steps on your second laptop, B, but instead this time loading b.grc, and using sudo ifconfig tap0 192.168.1.20.
We found it was best to assign ARP entries manually to each laptop. In order to assign an ARP entry, on laptop A, arp -s 192.168.1.20 <Laptop B’s MAC address for tap0> -i tap0
The setup script, which you have initialised on both laptops copied the patched files to Gnuradio, as well as modifying TCP options, in order to allow TCP/IP to work across a very laggy network.
echo 100 > /proc/sys/net/ipv4/tcp_syn_retries
echo 0 > /proc/sys/net/ipv4/tcp_syncookies
echo 100 > /proc/sys/net/ipv4/tcp_synack_retries
The first line is necessary in order to enable a client side TCP connection to stay open longer than the default of 20 seconds, before closing.
Testing
In order to test the network is functioning correctly we recommend using netcat. To test out TCP/IP connectivity Use netcat -vv -l 10000 on Laptop A, and connect to it from Laptop B, using netcat -vv 192.168.1.10 10000. Because we are using the verbose options, netcat will inform you when a connection to Laptop A has been established, you can then send text from either laptop to the other one.
Gnuradio patch
As the packet encoder and decoder provided by Gnuradio only work with fixed amounts of data, it was necessary to modify them to support the reading of stream tags. The “PDU to tagged stream” tags packets from the tap interface with their size. The packet encoder/decoder can’t process these tags normally, so we altered the packet encoder, to read these tags, and generate the appropriate sized packet from the tap0 frame. The packet decoder, then unencapsulates the packet, and tags the resulting data, with its size.
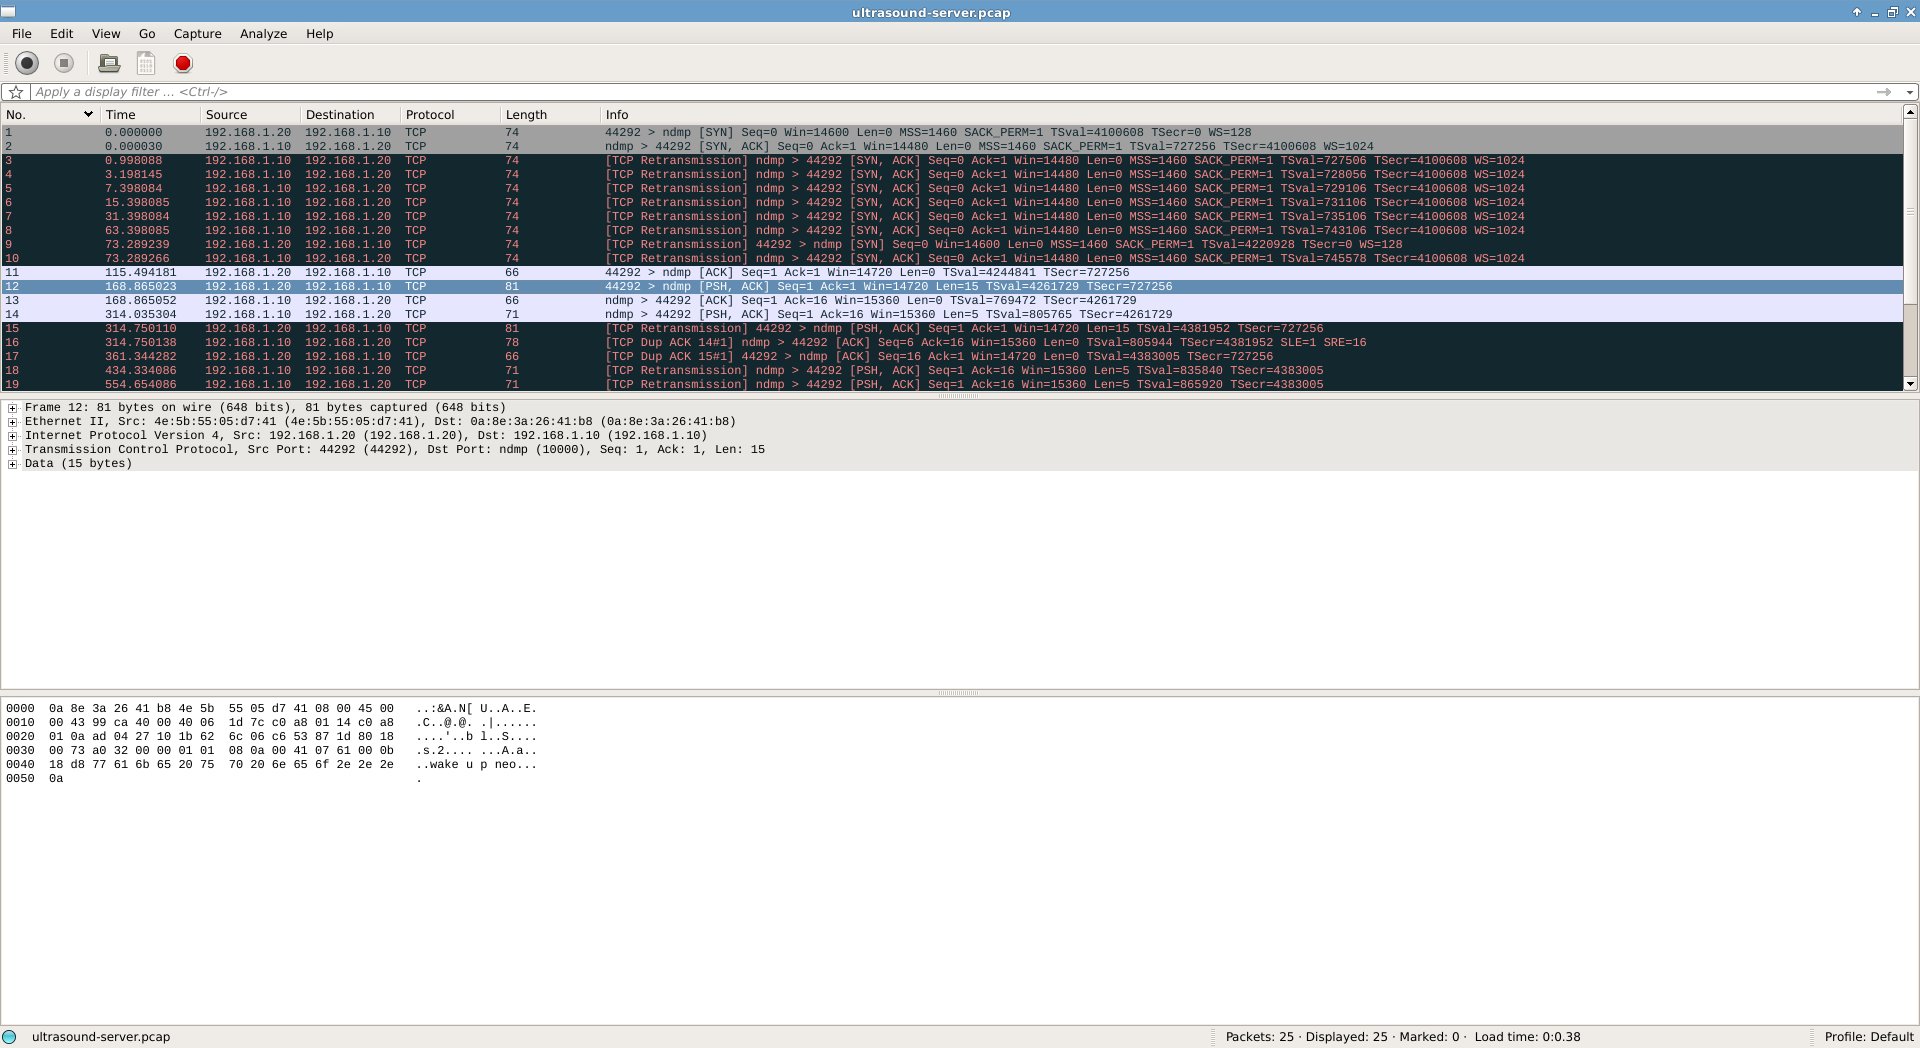
PCAP file
To give you an idea of the latencies involved please click on the image below, which shows you a wireshark screenshot, showing the server side of a TCP/IP connection. You’ll see it’s slow!
Grab the Gnuradio files from github
https://github.com/anfractuosity/ultrasonicnetworking
If anyone’s got any suggestions for improvements to the Gnuradio patch I’d be most appreciative (the patch itself was done very quickly).
Why not use minimodem?
Minimodem looks like a great program, but as far as I’m aware it supports only FSK. I was keen to try different modulation schemes, which Gnuradio provides many of; I originally tried the setup with PSK.
Also this provided me with an introduction into how some of the techniques used for Software Defined Radio work.
With thanks to the folks on #gnuradio for their help
19 Comments
Leave Comment
Error
Menachem Begin
Congratulations, you’ve invented ‘the modem’.
Kidding, mostly.
admin
Hehe, yeah you’re completely right though. It was fun learning
how to do it using Gnuradio though.
Greg
Awesome demonstration that most airgapped computers can be made vulnerable.
https://www.schneier.com/blog/archives/2013/10/air_gaps.html
Interesting last paragraph there.
“Of course you can take things further. I have met people who have physically removed the camera, microphone, and wireless capability altogether. But that’s too much paranoia for me right now.”
Vatsal
Nice work !
Jelle De Loecker
Interesting experiment.
What’s the speed like? Is it near old 56k modem speeds or slower?
admin
It’s a lot slower, to ensure it’s resistant to noise.
I’m planning on testing out different modulation schemes to try and improve the throughput (such as 4-FSK etc.).
Jelle De Loecker
Oh, so could multiple frequencies be used?
I guess that, in theory, the speed can be better than a 56k modem, right?
(Because the compression of a landline call and such)
admin
Yeah, at the moment I’m using 2-FSK, meaning there are only 2 slightly different frequencies used for each transmission (representing symbols 0 and 1). Something like 4-FSK would give a higher throughput.
The problem with communicating over the air is that there is lots of excess noise you have to contend with, e.g. people talking.
George
Actually in the video it is not clear at all that the sent data was received. The text color was too dark I guess…
admin
Yeah, the video quality isn’t great alas.
Name *Andreas
There’s also: https://github.com/Katee/quietnet/
Thanks for sharing 🙂
Hage Yaapa
Not TCP/IP (yet), but works in the browser – https://github.com/hacksparrow/remote.js
Fabiano Silos
George, you are right. We cant see text arriving into the destination host. But if you pay attention to the cursor, it moves 2 times slowly. sounds like it received a first “packet”, and after few seconds it received the latest drop of bytes.
Josan
I’m very interested in testing your experiment, but following your steps in diferent machines and different mics, and always obtain the same result: in gnuradio terminal output strings of ‘aUaUaU…. packet_len V: 145″ and no connect neither transmission after setup A and B, in some cases a timeout occurs and close netcat.
https://www.dropbox.com/s/yjyttd4w6vs4qi8/a_exec.grc?dl=0
Also I’ve seen your ultrasound-fsk.grc but I don’t kwow how can I test it.
I would be very pleasant for any help about it.
Thanks in advance.
Josan
Jim
I know this is a little laye but I have been looking at this as inspiration for s school project (Thank you for the great head start).
Josan, the issue is over/under runs because the sample rate is not respected throughout the system. the audio source is in bytes and the encoder ups that to 9 samples per bit ( we are at 72 samples now) then the resampler ups that by a multiple of 320…. now we are 23040 samples…. but we are putting it into a block expecting 48k.
The way I was able to get it to work was change the sps variable to 12 and the interpolation variable to 500. This respects the 48k across all blocks and everything worked fine for me after that
Josan
Thanks Jim,
A bit late, but I’ll try to test you recommend.
Naseeb Panghal
LiveDVD link is obsolete and i couldn’t find it at there official site anywhere.
If anyone still active on this page, please provide the new path for liveDVD.
Calvin Miracle
I wonder if an ODFM scheme would work in audio ranges? You’d be able to pack in more symbol information.
Tahoma Toelkes
I wonder if something like this might be good for inter-networking ocean-going vessels as a backup for expensive satellite modems.